Day 1 – Pex and Moles

Today was the first day of  my .NET 4.0 training. And I would like to share the highlights of each day. Well at least the highlights for me. So this is the first day of 5.

Introductions and first days are always slow. So this was no exception. There were some basic introduction things for people who have newer came into contact with electricity. But a good 5 hours in something was presented that caught my eye: Pex and Moles.

Pex and Moles are actually two separate peaces of software:

  • Pex automatically generates test suites with high code coverage.
  • Moles allows to replace any .NET method with a delegate.

I am still unsure about the real day-to-day value that moles will offer me. This is not because the software is not up to pair with what I would use but that I am mostly working on code I can change and refactor so that the need for such a tool is not needed. But more on that later on.

First you will need a copy of Pex and Moles. So here is the download link. You can even find a version for the express version (non-commercial). After you have the file just let the installer do its work an tolerate the 2 ~ 3 times your focus will be stolen (it is worth it).

First you need some code to let pex have fun with. I just quickly wrote a little class with one method. And here it is:

namespace PexAndMoles
{
    public class Calculator
    {
        public int Add(int one, int two)
        {
            if(one == 0 || two == 0)
                throw new ArgumentException();

            if(one < two)
                throw new ArgumentException();

            return one + two;
        }
    }
}

There is a reason for all those ifs in there. It is for the sole reason to give pex something to work on 🙂

So to get started just left-click on the method you want to “work on”. You should see something like this.
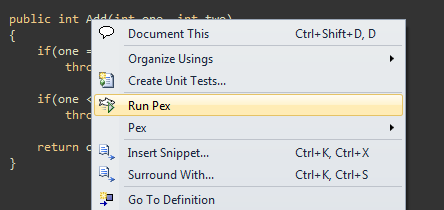
Run PEX

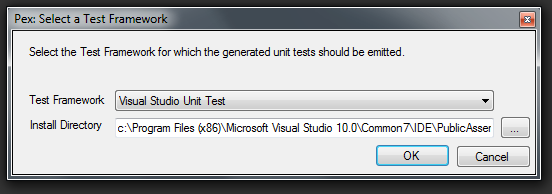
Pex will ask you which testing framework it should use. You can choose from all the major testing framework. But to keep it simple I chose to stick with MSUnit.

Select testing framework

After a short time where you are tempted by a “follow us on Facebook” link the results are presented and if you are lucky (depending on the code complexity) pex will find all major test scenarios for your method.

In my case this is what it came up with.

Pex results

And those are all the test scenarios I wanted (or even expected).

Now that you have your tests you want to keep them for later (most probably some sort of regression testing). So pex can help you there to. If you select all created “results” a “Promote…” button will appear. If pressed it adds the “results” as unit tests into your testing project or creates a new one and adds them there.

The code generated is confusing at worst and funny at best. It is not the go-to example of good/clean code. But it is auto-generated and can be regenerated if future changes break the tests. The naming convention is “acceptable”. Before I rant too much here is the code generated:

namespace PexAndMoles
{
    [TestClass]
    [PexClass(typeof(Calculator))]
    [PexAllowedExceptionFromTypeUnderTest(typeof(ArgumentException), AcceptExceptionSubtypes = true)]
    [PexAllowedExceptionFromTypeUnderTest(typeof(InvalidOperationException))]
    public partial class CalculatorTest
    {
        [PexMethod]
        public int Add(
            [PexAssumeUnderTest]Calculator target,
            int one,
            int two
        )
        {
            int result = target.Add(one, two);
            return result;
            // TODO: add assertions to method CalculatorTest.Add(Calculator, Int32, Int32)
        }
        [TestMethod]
        [ExpectedException(typeof(ArgumentException))]
        public void AddThrowsArgumentException547()
        {
            int i;
            Calculator s0 = new Calculator();
            i = this.Add(s0, 0, 0);
        }
        [TestMethod]
        [ExpectedException(typeof(ArgumentException))]
        public void AddThrowsArgumentException81()
        {
            int i;
            Calculator s0 = new Calculator();
            i = this.Add(s0, 1, 0);
        }
        [TestMethod]
        public void Add520()
        {
            int i;
            Calculator s0 = new Calculator();
            i = this.Add(s0, 1, 1);
            Assert.AreEqual<int>(2, i);
            Assert.IsNotNull((object)s0);
        }
        [TestMethod]
        [ExpectedException(typeof(ArgumentException))]
        public void AddThrowsArgumentException470()
        {
            int i;
            Calculator s0 = new Calculator();
            i = this.Add(s0, 2, 3);
        }
    }
}

And that is pex in a nutshell. At least that is what I was able to find out about it in the half day I spend with it.

I know that Moles was not mentioned here but I would like to spend some more time with it before writing about it in more detail, besides the post is long enough.

And that is all the time I have today.

Thx for your time.
A little BDD/TDD for all

Not knowing about BDD or TDD in this day in age is quite hard. If you have something to do with code then you have been confronted with the two concepts:

So the question is not if you should adopt the methodology, but how do you introduce the new methodology into your projects. The only correct answer is slow.

I must be honest that when TDD became “mainstream” I did not like it. Because you needed very senior developers that had the mental faculties and years of experience to predict tests for a method before it was actually written and consumed by other parts of the system. Before you start trolling and declaring me for insane hear me out!

Before the time of TDD the predominant structure of unit tests was based on methods. If you don’t believe me check your unit tests from last year. Most probably you will find something like this.

[TestFixture]
public class ClassAFixture
{
  [Test]
  public void MethodName_InputOrEnvironment_ExpectedResult()
  {
    // Prepare

    // Act

    // Assert
  }

  ...
}

For a Queue a test according to recepy would look something like this.

[TestFixture]
public class QueueFixture
{
  [Test]
  public void Enqueue_ValidItemQueued_OneItemInQueue
  {
    // Prepare
    var queue = new Queue<string>();

    // Act
    queue.Enqueue("test");

    // Assert
    Assert.That(queue.Peek(), Is.EquealTo("test"));
  }
}

If we stick to this recepy then this becomes practically impossible for more complex objects. But do not be fooled, TDD does not say that you have to write your unit tests like this. This is one of the many misinterpretations of TDD.

If by now you have not read the links at the top of the post and do not know the difference between BDD and BBQ, then do so now.

If you now combine BDD and TDD you have something that is achievable and even better the customer can write your tests(well not the actual code but their description).

To give a quick example.

The customer comes to you wanting to make an intelligent parachute. And after some talking you define the following requirement:

Given a defective parachute

when altitude drops below 500 meters

then emergency parachute opens

Thinking about objects and methods at this point is quite futile. I don’t say its impossible, but it is by no means trivial. So we have to take another path.

Now is the time when you start looking for tolls that will help you with that. There are some good ones out there. In the .net world I tested three:

But there are times when introducing a new tool is not an option(company policy, unwillingness of coworkers to try something new, it’s Friday,…). So you have to use something that is at your disposal and accepted in the company or the project team. In my case this was nUnit, a keyboard and my mind.

Using those ingredients much is possible but it had to be feasible and usable. So I started experimenting. The first permutation was something like this

[TestFixture]
public class ParachudeFixture
{
  [Test]
  public void GivenADefectiveParachute_WhenAltitudeDropsBelow500_ThenEmergencyParachuteOpens()
  {
    // Test code
  }
}

Looks nice and you can really do it before the actual code is there. But there was a fundamental problem with this approach. The problem is that the setup(given) has to be part of every test case. You can solve this using factories. But that would just be ignoring that you are using nUnit.

So I puled all the setups of one kind together in a separate fixture definition. And there is where I got my final model. So now I have something like this.

[TestFixture]
public class GiveADefectiveParachute
{
  private Parachute parachute;

  [SetUp]
  public void SetUp()
  {
    parachute = new DefectiveParachute();
  }

  [Test]
  public void WhenAltitudeDropsBelow500_ThenEmergencyParachuteOpens()
  {
    // Test code
  }
}

And as an added bonus the test run looks nice in the GUI tool.

Before you run off trying to adapt this to your code STOP and read on. This is by far not an ideal solution and it has it’s drawbacks. But personally it worked for my current project and helped me a lot when I checked if my little peace of software supports a magic feature. And what I noticed is that: when I was refactoring my code It was extremely easy to find and remove or refactor obsolete tests.

As a final word of advice: If you can use a framework for TDD/BDD then by all means do. You do not rewrite nUnit every time you want to write a unit test.

There a many frameworks that work and the three I mentioned are quite good.

Constraint-Based Asserts and NUnit

In this post I will concentrate on NUnit and it’s “new” feature. Well not exactly new,  but a feature that are around since version 2.4 (current version is 2.5.2). This feature, that I would like to present here, is the constraints based assertion.

Before we start with the new and shiny let’s look at the old and proven.

[Test]
public void FooTest()
{
  var result = DoSomething();

  Assert.AreEqual("something", result.Text);
}

This is what we know and this is what we work with. The problem is that people manage to confuse the expected and actual parameters of the assert statement. Which then results in funny little mishaps. But this is not the theme of this post.

What I would like to show here is the constraint based assertion. To get us into the subject here is a little example.

[Test]
public void FooTest()
{
  var result = DoSomething();

  Assert.That(result, Is.EqualTo("something"));
}

Looks nice and it is. What I find good is that it gets harder to confuse the expected and actual values.

The best thing is that you can chain the constraints. This would then look like the following.

[Test]
public void FooTest()
{
  var result = DoSomething();

  Assert.That(result, Is.Not.EqualTo("gnihtemos"));
}

The next thing is not really in context with the posts title but I think that it is such a nice feature that it is worth mentioning. The “thing” in question is the exception assertion. To get the record straight I find nothing wrong with the ExpectedExceptoin attribute but this new version is just cleaner.

So as before lets look at the old and proven before we take a look at the new and shiny. The old and proven would look like this.

[Test]
[ExpectedException(typeOf(SomeException))]
public void ExceptionTest()
{
  ThrowsSomething();
}

This is nice and nicely extendable. What they came up with is a non attribute version that works really well.

[Test]
public void ExceptionTest()
{
  Assert.Throws<SomeException>(() => ThrowsSomething());
}

This is nice and becomes quite readable without being to invasive. And I personally quickly fell in love with this way of testing for exceptions.

With this much goodness there has to be something bad. And there is. What you will find hard to do is to integrate your custom constraints into NUnit. You actually have two variants how to use your custom constraints without poking into the framework itself.

Option one is to use a build in construct and get code that would look something like this.

[Test]
public void MyCustomConstraintTest()
{
  MyObject result = DoCustomStuff();

  MyConstraint constraint = new MyConstraint();
  Assert.That(result, Has.Some.Matches(constraint));
}

And option two which requires less code but does not look that good.

[Test]
public void MyCustomConstraintTest()
{
  MyObject result = DoCustomStuff();

  Assert.That(result, new MyConstraint(););
}

There is always the option to hack at the framework and integrate your custom constraint. But I would not recommend it.

As a last thing lets take a look at how you can write your own constraint. It is actually quite simple. All you have to do is to derive from the Constraint class. The base class itself is abstract and features many methods that you can override. But in most cases you will just need the two abstract ones.

Your custom constraint could look something like this:

public class MyConstraint : Constraint
{
  public bool Matches(object actual)
  {
    if(actual is MyObject)
      return ((MyObject)actual).Quantity > 0 ? true : false;
    return false;
  }

  public void WriteDescriptionTo(MessageWriter writer)
  {
    writer.write("MyConstraint failed");
  }
]

So this is the gist of it. I hope that you got a little insight into the new features of NUnit.

All that is now left to do is to use it 🙂

Visual studio tests and external files

Writing unit tests should be an easy task. The hard task is writing the code. So it came as a suprise that using a file in a unit test is such a cryptic task. Why? Well just try to use it in a test written on the visual studio test framework. To be honest I have no clue how to call it! I guess that tells us a lot about it. I searched the net high and wide and foud that other people have the same problem and that “it” has many names like:

  • VSTS
  • TFS test

Blah blah blah. I am drigting off. Back to the topick.

So I wanted to write a unit test that will:

  1. Initialize all my little classes
  2. Read the contents of a XML
  3. Get a value out of it
  4. And check if the my classes have correctly interpreted the class

Simple right? Done it a million times, using nUnit. So I wrote my test as every “sane” developer (if something like this exists). And lord behold it did not work. All I got was a System.FileNotFoundException.

Long story shord and to not take the fun out of a good day of reverse enginering the framework. Well as it turn out the output directory of the test project is not used to run the tests. So you have to tell “it” that it has to deploy this additional file. How do you do this? With an attribute, what else!

And now finally the time for some code.

[TestMethod]
[DeploymentItem("Sources\\ProjectName\\default.xml")]
public void GetXmlResourceValue()
{
    MyLittleClass reader = new MyLIttleClass("dafault.xml");
    reader.Initialize();
    Assert.AreEqual("ExpectedValue", reader.GetValue("testKey"));
}

The important attribute is the DeploymentItem attribute which has to be added for each file we want to use. In my opinion this can get pretty ugly pretty fast. Because a unit test with 5 lines of test code attributed with 10 Deployment attributes can not be good for the code readability and maintainability.

But we will have to live with that.

Hope this will help someone.